[Originally published on 10-10-2018]
[Updated on 04-19-2018]
The CMA exam adopted a new look beginning January 1, 2019. Going forward, candidates taking either part of the exam will see these interface enhancements.
These changes were implemented at all Prometric Testing Centers around the world. These are just visual updates designed to enrich the testing experience. The ICMA did not make any modifications to the format of the exam or the Content Specification Outlines/Learning Outcome Statements.
Click here for a preview of the new interface.
Understanding how to use the CMA exam software is essential for having the smoothest, most comfortable exam-day experience, so we are going to cover all the updates below. Let’s take a more in-depth look at the CMA exam’s new interface, starting with…
Navigating MCQs and selecting answer(s) in the new CMA exam interface
Moving through the exam is simple, and this style of navigation tends to be similar across all computerized exams. You will see two buttons at the bottom of the testing screen—a “Next” button and a “Back” button. Click the “Next” button to move forward to the next question, and likewise click the “Back” button to return to a previous question.

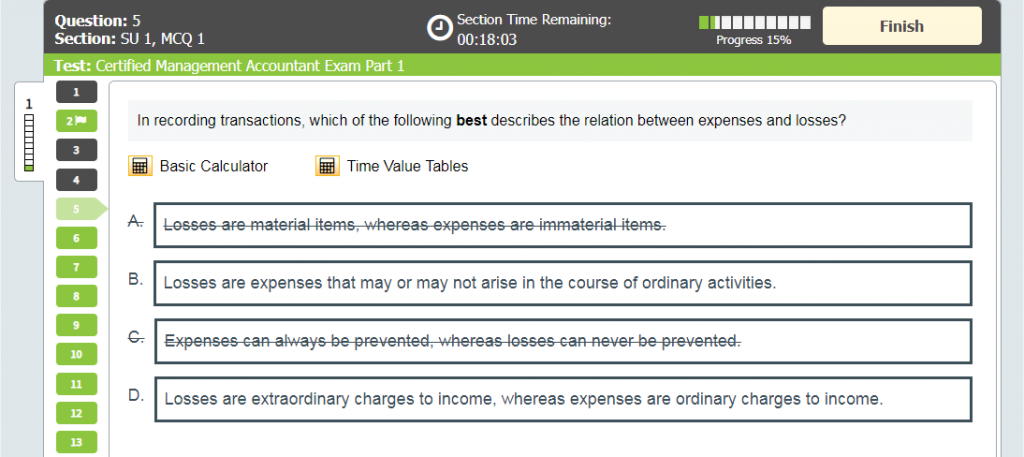
You also have the option to mark, or “flag” questions, and quickly move to a specific question, without needing to click the “Next” or “Back” buttons repeatedly. If there is a question you want to move to instantly, locate and click its numbered button on the left side of the screen.
To help yourself remember which questions you may want to go back to, you’ll want to flag them by simply clicking on the “Flag” button when answering them. When you click the “Flag” button, a little flag icon will appear next to the question’s numbered tab over on the left side of the screen, clearly marking it so you know to return to it later. If you flag a question by mistake, clicking the “Flag” button once more will remove the flag. Keep in mind that you will also want to remove any flags from questions you have gone back to, addressed, and finished.

As an example, let’s imagine that you had to make an educated guess because you were not sure how to answer Question 3, and you flagged it and moved on to other questions. You are now viewing Question 11 and would like to go back to Question 3.
Since you flagged Question 3, you can now easily find it on the left side of the screen (with a little flag icon on its numbered tab) and click its tab to move directly back to Question 3. After answering it, you would remove the flag by clicking the “Flag” button once more, and then return to Question 11 by clicking the numbered tab for Question 11.
It is important to attempt to answer all questions, and be sure to watch for questions that are marked as “incomplete”. If you have to guess an answer, do your best to answer the question before moving on, then flag that question so you remember to return to it later in case you have time left over to check your previous answer(s).
Answering Questions
To select your answers, all you must do is click on the answer option you feel is the best choice. The answer choices you click will become shaded in an orange color to let you know they are currently your selected answers. You can change your answers at any time by clicking on the same answer once more or by clicking on a different answer choice.
Note: the numbered tabs on the left will change in appearance, letting you know which question you are currently viewing.
- “Incomplete” answers are represented by green rectangular tabs.
- The currently viewed question is represented by a green, arrow shaped tab.
- “Complete” answered are represented by dark gray rectangular tabs.

How to highlight and review in the new CMA exam interface
Though it is likely more helpful during essay sections, you may highlight the text in a question or essay scenario in case you need to mark it as important, or just want to be able to quickly refer back to it. Like a flag, any highlighting can also be removed.
In order to highlight, all you must do is click and drag the mouse over text and then click the “Highlight” button (it will appear once you release your mouse button). To remove any highlighting, click anywhere on the text that’s been highlighted.

Note: you will not be able to highlight text in answer choices on the MCQs.
Another optional (but helpful) review feature is Strikeout. This feature allows you to visually eliminate answer options so they are no longer distracting. As with flags and highlighting, text that has been struck out will remain so unless you decide to remove the Strikeout. To use this feature, or to remove it, right-click the answer option. You may still select a struck-out answer option as your answer choice by left-clicking on it.
Note: you may not need to use these functions at all, especially if you feel you can focus or test better without them. If you feel as though they are more of a distraction, don’t worry about using them. Just be familiar with them in case you decide you prefer them.
Where and how to track time in the new CMA exam interface
The amount of time remaining for the exam will be displayed at the top of the testing screen. You’ll be able to choose whether you want to see the time you have left in the current section or the time left for the entire exam—all you have to do to switch between these times is click on the clock icon. You may also receive a notification when there are 15 minutes remaining, as well as another notification once there are only 5 minutes remaining.

Other helpful visuals
If you look at the top-right corner of the testing screen, to the left of the “Finish” button there is a Progress bar. This segmented bar, which displays a corresponding percentage, reports your progress through the overall exam, and updates as you complete questions and move forward.

The Settings button, located near the bottom-left corner of the testing screen, offers an array of alternative color settings that some test takers may find quite helpful. To access these options, left-click the Settings button (the icon that looks like a gear), and a settings window will appear.
Note: if the default look of the exam is readable, don’t spend any valuable time adjusting these settings.

In the new window you’ll see many different options for both text and background colors. If you do not like the default testing screen colors, or find that they make reading strenuous or difficult, you may choose a more suitable color scheme from the Settings menu. Once you have selected a color scheme, click the “Close” button to return to the testing screen. If you wish to reset the screen to the default colors, click the Settings button, then click “Default color scheme”, and click “Close”.
Once you have selected a color scheme that works best for you, be sure to use the same colors during your review as you do when taking the exam, so that your practice exams feel as realistic as possible for exam day. Try to select these settings as quickly as possible at the beginning of the exam so you do not lose valuable testing time (practice this while reviewing so it will be familiar).
Exhibit buttons
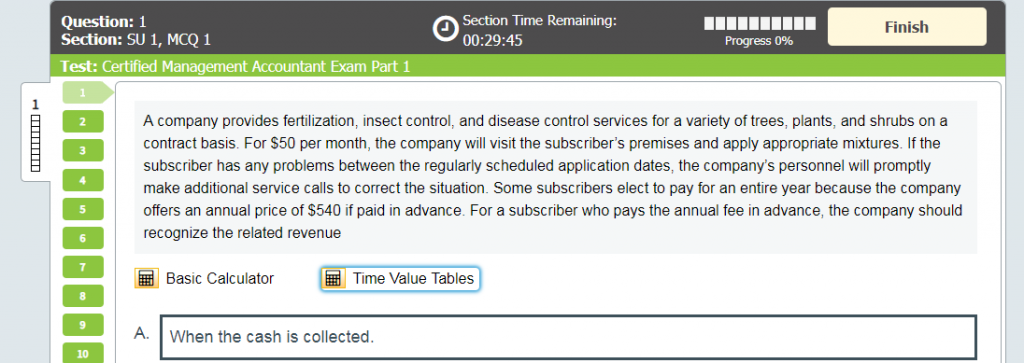
The Exhibit buttons are built-in tools that will aid you in answering some questions. They include the calculator and Time Value Tables.
The calculator is a basic tool for simple calculations, and is similar to those used in common software programs. It can be accessed by clicking the “Basic Calculator” button which appears beneath question text and above answer choices, toward the left side of the screen.
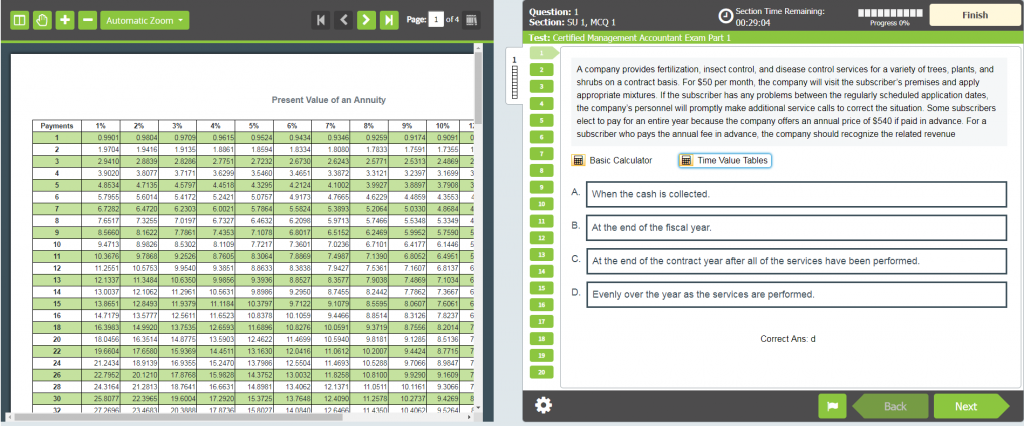
The “Time Value Tables” button gives you access to time value tables for questions that require them. When clicked, they will open as PDFs. The “Time Value Tables” button appears beneath the question text and above the answer choices, near the left side of the screen and to the right of the calculator.
Essay section
This section will look a little different from the multiple-choice section. Below the question, you will be provided an answer box in which to type your answer. This box includes editing functions commonly found in other word processing software programs, such as bold, italics, text alignment, an indent button, as well as “undo” and “redo” buttons.
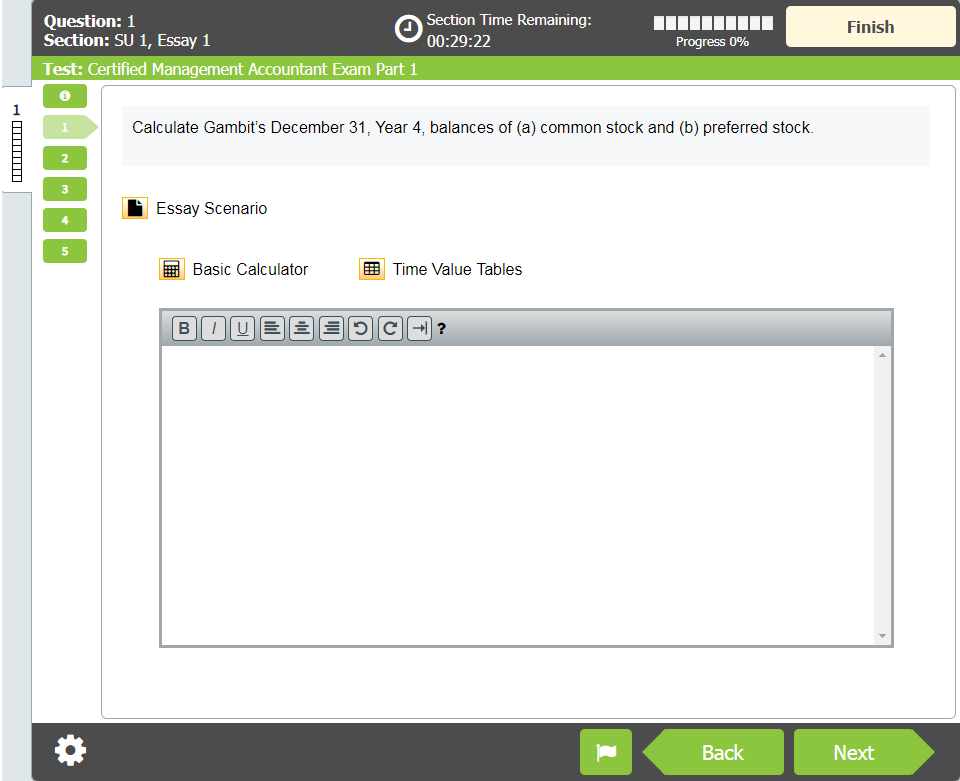
Beneath the essay question and above the answer box, you will see an “Essay Scenario” button. Clicking this will open a PDF document providing the scenario related to the essay question.
Scenario documents will open and appear to the left of the screen where you are answering the corresponding essay question(s). Multiple-page documents can be navigated by using the scroll bar (the gray bar on the right side of the document) or by clicking the left and right (“next” and “previous”) green arrow buttons in the top-right corner of the document screen.
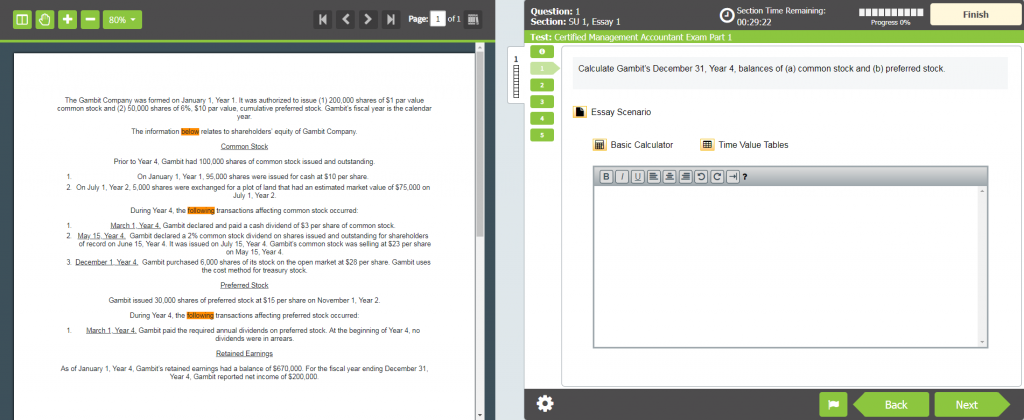
If the text is too small or difficult to read, you may use the “+” and “-” buttons to manually zoom in or out, making text larger or smaller. Using “Automatic Zoom” allows you to adjust the document more quickly to specific sizes.
Note: If the information on screen is easy enough to read, don’t spend a lot of time making adjustments to settings, and focus on answering the question(s).
As on the multiple-choice section, you will be able to navigate back and forth between the questions by using the “Next” and “Back” buttons at the bottom under the answer box, or by clicking the numbered tabs to the left of the question.
Finishing the exam
Note: when taking either part of the CMA exam, you are allowed 3 hours to complete the multiple-choice section. Once you move from multiple-choice questions to essays, you cannot return to the multiple-choice questions, so, if you have the time, make sure to check your multiple-choice answers before beginning the essays. Likewise, be sure to review your essay answers before finishing the exam.
Check your answers using review mode or by clicking through the numbered tabs on the left side of the screen. When you click “Finish”, your answers are submitted as-is, including any unanswered questions. Be sure to try and answer all questions because incomplete and/or incorrect answers do not cause you to lose points. Rather, every question is an opportunity to earn more points!
Once you have attempted all the questions, and, if you have time, checked your answers, you can finish the exam by clicking the “Finish” button that displays in the top-right corner of the testing screen. Once you click “Finish”, you’ll be prompted to confirm once more that you wish to end the exam.

Familiarity is essential for exam success
There are several important factors that determine your success on exam day, and one that you don’t want to overlook is your familiarity with the look and feel of the actual exam. Knowing the exam software, the interface, and the tools available to you will help you to be as comfortable and confident as possible when you sit for the CMA exam.
The CMA exam interface isn’t too complicated, but if you’ve never seen or interacted with it before, it’s potentially distracting from the most important parts of the exam. Rather than waste time learning the software on exam day, and adding to your exam anxiety, be sure to get familiar with the interface now, so there are no surprises when you head to the Prometric Testing Center.
Another great way to familiarize with the CMA exam is to use a CMA review course that looks and feels like the real exam. Gleim CMA Review is not only the #1 CMA exam review, we are also the first and most widely used. More IMCA Exam Medal winners pass with Gleim, and our course software emulates the CMA exam more accurately and realistically than any other course on the market. And don’t worry—the 2019 Gleim CMA Review, releasing in early November, will reflect the new look to to help you feel at ease on exam day.
“Maybe the best aspect of the Gleim Review System is how the quizzes and practice essays simulate the testing environment. When you get to the actual exam, you will have no surprises in regards to the process, layout, or functionality. I believe just being comfortable and confident is half the battle on exam day[…]” — Jacob Jarrell, CMA
“I already had the opportunity to study for the PMP test using other materials[…]I think that Gleim is the best solution I’ve had so far because of its easy-to-use interface and similarity with the actual test (visually and in content).” –Julio Damiao, CMA, PMP
For more information about what to expect on the CMA exam, as well as how to prepare, be sure to check out our CMA Exam Guide.


